

Once your packaging is ready to be printed with your custom graphics, you’ll have the option to visit the printer and participate in what is called a press check. Is this important? Should you go? What does a press check involve?
Yes, yes, and I’ll explain.
A packaging press check is an opportunity for you, the buyer, to visit the print shop just before they print to make sure that everything is correct. It’s an opportunity to verify color, stock, image placement, text, and more. This is important because once the packaging is printed, there’s no going back without substantial loss of money and time. (If you can’t go to a press check because of time restraints or excessive distance, make sure you have a representative there on your behalf – a broker, sales rep or other with experience and your best interests.)
The printer will give you a set time to do the press check, don’t be late. The press check can be at any time of the day or night.
The pressman will run the printer for a few moments and offer you the first samples (often called press sheets) for you to inspect. The press sheet will likely be printed and ready before you arrive. Usually there is an area where you view the samples. It is often a neutral-colored, well-lit area or room.
Packaging Press Check – Things You Should Be Looking For:
- Correct stock
- Current version of your artwork
- Proper fonts
- Blemishes
- Overall look
- Accurate Color
1. Correct Stock
The first thing you should do is check to see if the packaging stock is correct, whether that be paperboard, corrugated, plastic etc. Just make sure that the agreed upon packaging material (often called the packaging substrate) is what is being used. For example, if you ordered a folding carton made with 18 pt SBS, make sure that is what they are using. It can happen that, through miscommunication somewhere along the line, the printer uses the wrong packaging substrate. So it is important that you compare what the printer is using with a sample of the correct substrate that you bring with you. Make sure it is the same weight, color, texture and finish. If you are unsure, ask.
2. Current Version of Your Artwork
Next, verify that the printer is using the correct version of your artwork. Have a sample of (or make a note of) a specific area that shows the latest change(s) you made in the up-to-date and correct version of your artwork. Make sure that those change(s) are present on the press check sample. If the changes are not there, then you know that they are using an older and incorrect version of your packaging artwork.
Make sure there is no missing content in the artwork – all the images/photos, design elements and text are present and accounted for. Do they have the proper image crops? Also, are any embossing, foil stamping or die-cut areas clearly indicated (if applicable).
3. Proper Fonts
Make sure that the correct fonts are being used (no font substitution) and that there is no broken type. They should be the same fonts as on your digital proof (AKA color proof, epson proof).
4. Blemishes
Make sure there are no blemishes, spots, marks, or scratches (often referred to as “hickeys”). This is often caused by dust on the printing plates.
5. Overall Look
Is the overall look consistent? Is everything clear and crisp? If there is blurriness, it could mean that the registration is off on the printer. Below is an example of an image that is off registration.

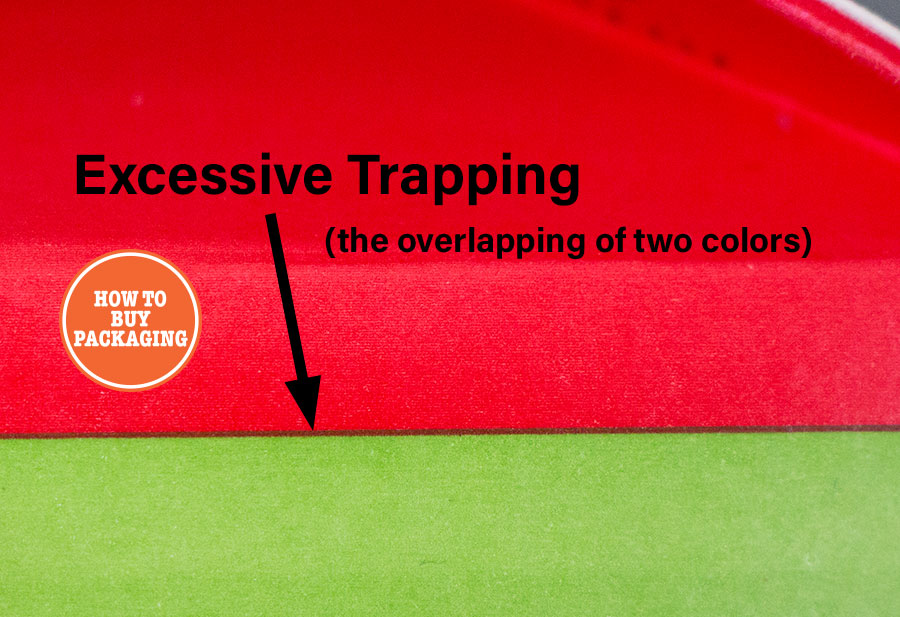
When two different colors meet, there is a tiny area where they overlap (called trapping) creating a thin line comprised of both colors. Make sure that there is not too much overlap where it becomes noticeable. Below is a photo example of bad trapping.
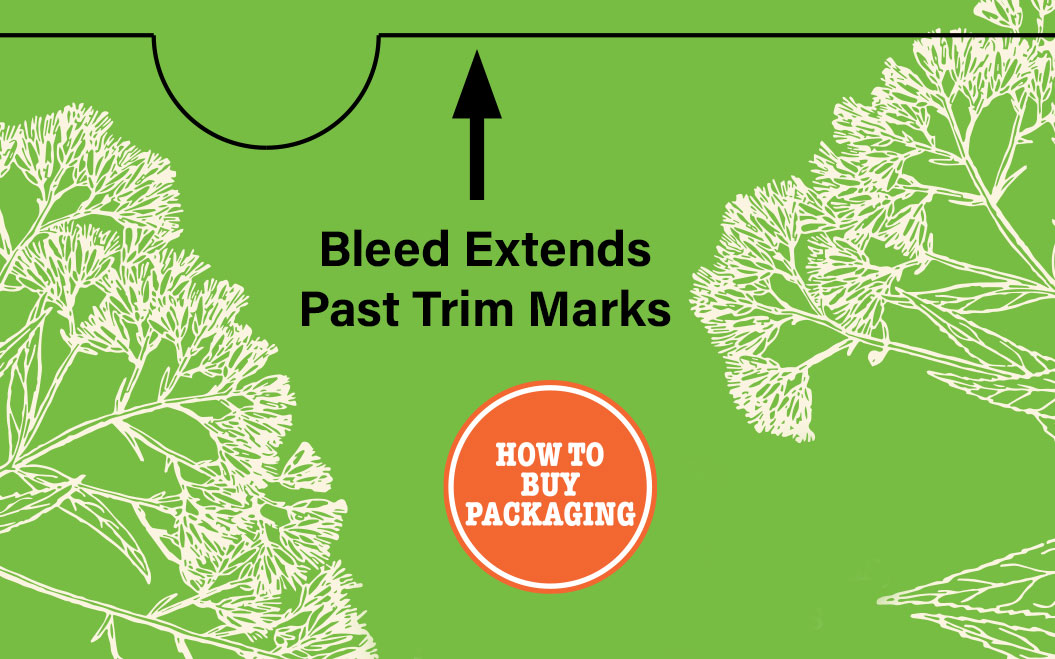
Make sure that the bleed extends past the trim marks.
Color consistency – are the inks consistent (ink density) across the entire press sheet? For example, in areas where there may be large regions of solid color, is the color uniform throughout, or does it fade or change tint or hue (when it’s not supposed to) from one section to another?
6. Accurate Color
In most cases, the pressman will have made fixes with registration, color consistency and blemishes before you even show up. So the press sheet they give you to examine will likely look great. But color accuracy is probably the most important element of the press check and one of the main reasons that you want to be there.
Does the color match the sample of your previous packaging (if you have one), or the digital proof or Pantone color book, that you have with you? This is the time where the pressman can alter the colors to your taste. For example, if you want a slightly darker red, the pressman can make adjustments then run a few more press sheets for you to inspect. They can do this until you are satisfied with the colors. Remember, unless you are using PMS colors, color accuracy is only approximate, so don’t expect perfect color matching. And, depending on the type of packaging you are having made, some printing methods are less forgiving than others when it comes to accurate color matching.
Also bear in mind that if you notice typos or any other errors during your press check, these are problems that should have been addressed during the graphic design and preflight stages, and you must weigh the consequences of stopping the job to fix the issue(s). Having a tiny misspelled word may be something you can live with.
Generally speaking, most print shops are run by reliable, competent people. However, unless you have done a lot of business with a certain print shop and you are re-ordering your packaging from that same shop, it’s important to go to all press checks. Even when you know the print shop and have had a lot of work done there in the past, it’s always good to have another pair of eyes going over everything. Especially when those eyes belong to the person with the greatest vested interest in that particular print job.
NOTE: A typical print shop is a huge industrial facility that is busy and noisy, and it can be intimidating to the inexperienced. Don’t be nervous and take your time. After all, this is your print job and your money. Make sure you are certain before you sign-off on the press sheet. And by all means, ask questions. The folks at these print shops want you to be satisfied and are generally happy and eager to answer any questions you have. And, of course, the more packaging press checks you do, the better and more competent you’ll become.
TIP: Bring a pen with you and number the press sheets as you receive them with each color change. It’s easy to get mixed up as to which one is which.
Here is a checklist for you to download and take with you on your next (or first) packaging press check that should help you stay focused.
This has been a part of my tutorial series called How to Buy Packaging 101. So click the link below to head back if you haven’t finished reading it yet. 🙂