

Digital proofs for packaging are often used in the industry as a means of showing the buyer what the finished artwork will look like on their packaging (a folding carton, for example). These are sometimes called epson proofs, color proofs, paper proofs, and are actually printed out, using a digital printer, at 300 dpi (dots per inch) and are offered for the packaging buyer’s inspection. Once satisfied, the buyer “signs-off” on it by writing their signature and date on the proof itself. This gives the manufacturer the OK to proceed with the job of printing out the actual packaging.
These proofs are generally very good for giving you an idea of what the finished product will look like, but they are only approximations.
For example, as mentioned, an epson printer will print the proof at 300 dpi. But the actual printing plates that are created (with your custom graphics) for the lithographic printer (used to print your boxes) would have a much higher resolution of, say, 2450 dpi.
What this means is that odd unexpected things can show up on the finished product that were not seen on the epson proof (digital proof).
Digital Proofs for Packaging…Gone Wrong.
Repeating patterns are sometimes used for the graphics on packaging. They can be tricky to work with if the graphic designer is inexperienced. When you are working in a graphics program like Adobe Illustrator for instance, tiny errors can occur that are difficult to detect.
All the following images are screenshots from Adobe Illustrator (not images of digital proof print-outs). In other words, this is what the graphic designer would see on his/her computer screen.
Here is an image of a repeating pattern on a simple folding carton die-line zoomed at 66.67%.
One can easily see tiny white lines going through the yellow leaf.

At 300% zoom the horizontal line is suddenly gone.
And at 400% zoom the vertical line disappears.

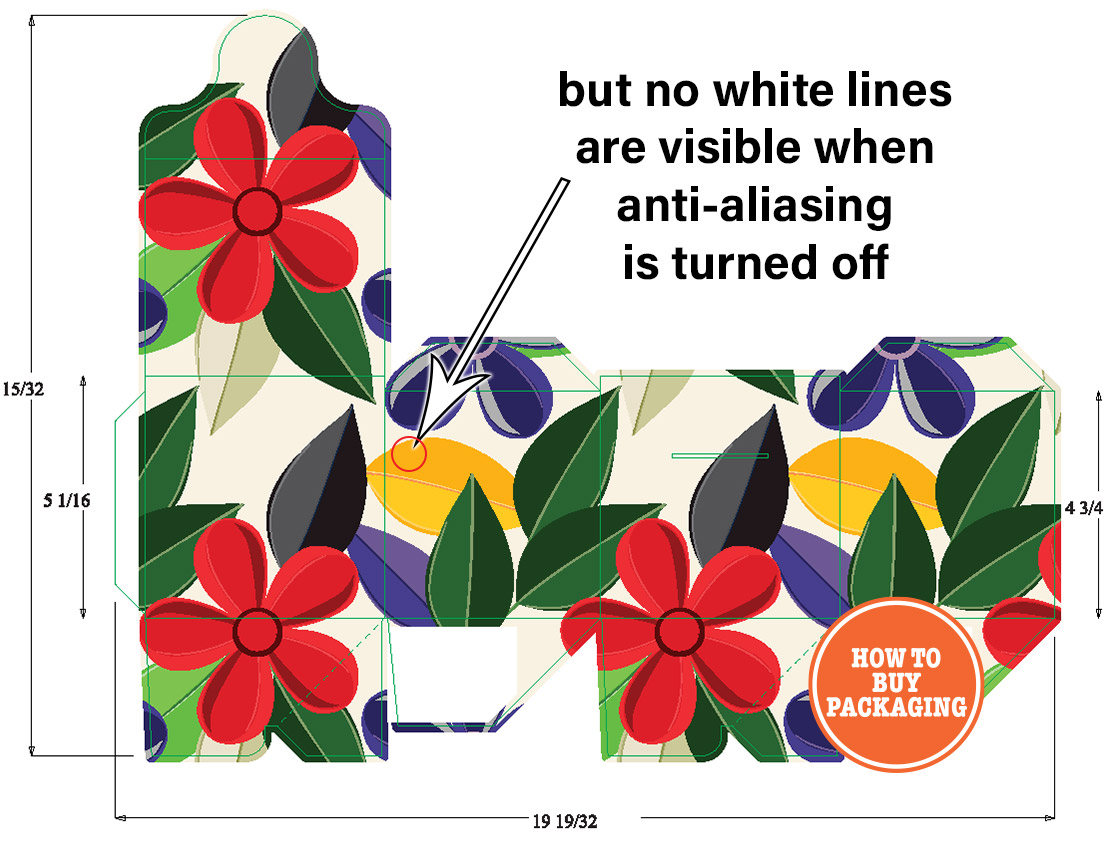
And when anti-aliasing is turned off in the preferences both lines have vanished…
…and are not visible again until the artwork is zoomed to 2400%.

So what’s going on here, are the lines really there or not?
Hmm, perhaps I can get a digital printed proof (printed at 300 dpi) that will show whether the lines are there or not.
Unfortunately, a digital proof printed at 300 dpi resolution will not show these lines. But once the actual printing plates are made (at 2450 dpi), the lines will show up. The problem is, these plates are expensive tooling and would have to be remade in this case, once the artwork was fixed in the graphics program first.
I’m showing all of this to demonstrate that it can be confusing to the inexperienced graphic designer who may be designing your packaging. Are the lines actually there or not? And if the artwork is really busy, unlike the above example, these issues could be very hard to detect.
And it begs the question, who is responsible? Should the designer have spotted this? The manufacturer? If the digital proof was signed-off on (which showed no tiny white lines) should the manufacturer be responsible to pay for remaking the printing plates? This is where people can get angry and frustrated.
Other Common Graphic Design Problems Are:
hidden layers in the files that should have been removed
layers that are poorly organized
layers that are not labeled properly or even at all
the use of low resolution images.
the wrong version of the file – always include a date and version number in the title of the file (as files are emailed back and forth, the designer and/or packaging manufacturer are confused as to what version of the file is the up-to-date one)
Fonts not embedded or outlined
Images are linked to and not embedded
And once these “messy” files are passed along to the manufacturer’s graphics department for preflight, they will have a hard time prepping the file for printing. In addition, their time is limited as well – meaning they don’t have the time or patience to sort out a badly prepared digital file of your packaging artwork. And if they have to fix a lot of problems, you may get charged for it.
Also, something else of note here. The proof is a flat piece of paper – a printout of the artwork on the packaging dieline. It is not usually a 3 dimensional mockup of the box (although you can request a 3D rendering of your box with the artwork on it and some manufacturers will be able to provide that).
So, once the manufacturer is finished printing out all your boxes, and the box is folded into its proper “box shape”, I’ve seen logos (which are obviously meant to be visible) covered up by the tucks of a poorly designed auto-bottom folding carton. This is the result of a careless manufacturer and not so much the fault of the graphic designer. Even an experienced graphic designer could miss this error, but the manufacturer definitely should not! And an error like this is something that is usually discovered, sadly, once the job is finished. I recommend cutting along the dieline of the printout, then folding and taping the box together. This is a great way to check art placement.
The Morals of the Story are Simple:
Use a legitimate graphic designer who has experience in packaging, not a cheap one, or friend of a friend who owes you a favor, your cousin’s son or daughter, or some random person in your company who says, “I know how to use photoshop” etc.
If you have any questions or concerns about the digital proof and your packaging, make sure you get proper solid answers from the manufacturer or broker before you sign-off on the proof.
Try to get an actual mock-up of the box so you have a better idea of how it will look (unless it’s a re-order, obviously)
Use a good manufacturer, not necessarily the cheapest one! (cheap almost always means “corners will be cut” and the resultant “low quality”)
Now, just to finish with the earlier example, I want to show you a quick and easy way to double check artwork when strange lines appear. Since this artwork was created with Adobe Illustrator, the below screenshots pertain to that software.
So in order to make sure that the patterns are repeating seamlessly, select all the layers and go to the object menu and hit “expand”.
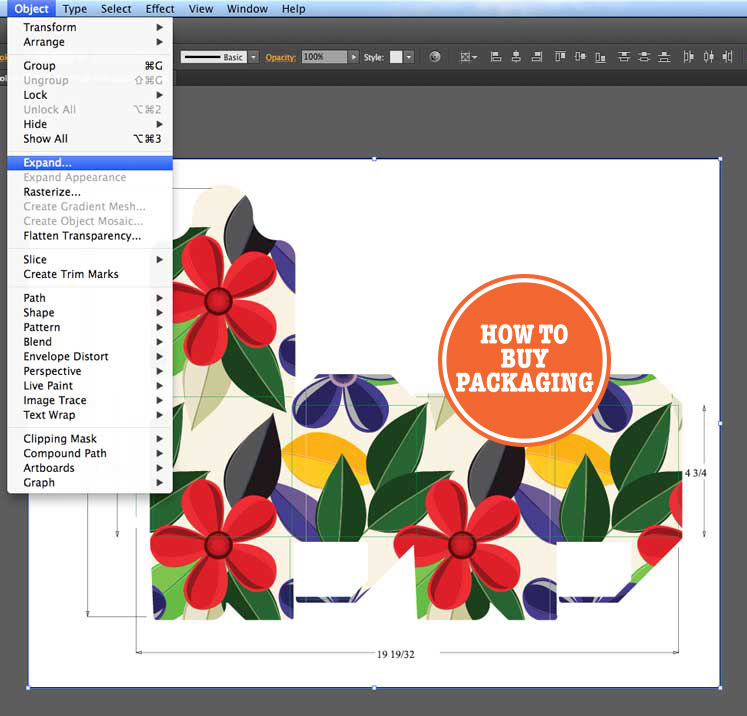
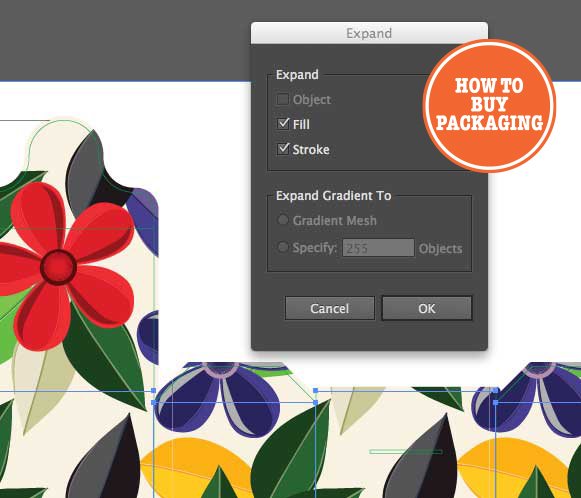
Then Click “OK”
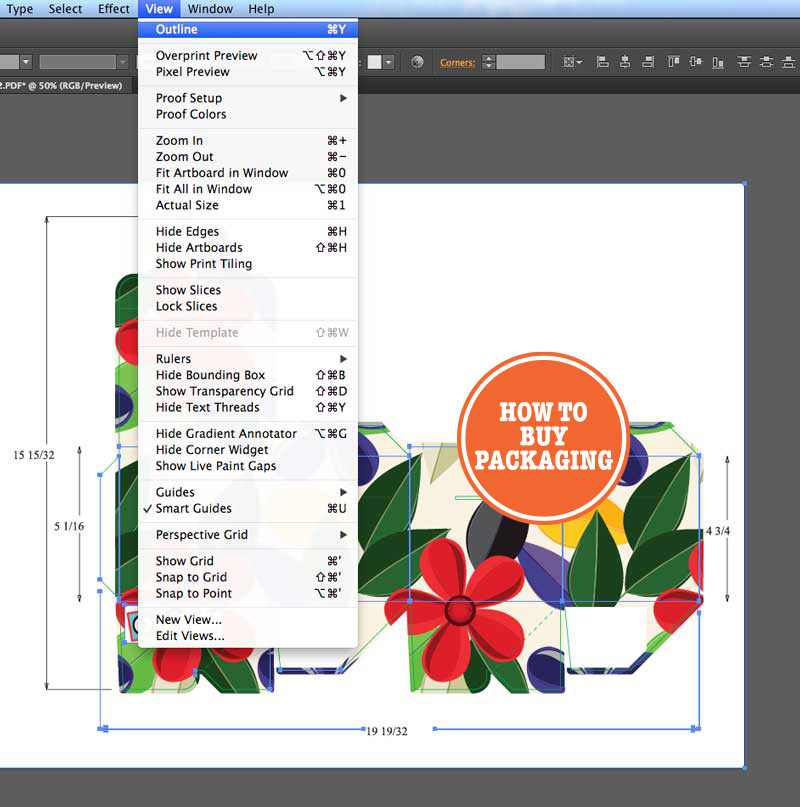
Then go to the view menu and select “outline”.
You would then see something like this:

Now it’s time to zoom in on the area in question (the spot where the unwanted white lines appear). It’s not until the artwork is zoomed in to 2400% that one can notice that the white lines are, in fact, truly a problem and not the result of some display or application redraw issue. Notice how the lines have a gap. These lines should appear, of course, as one line.

The graphic designer who was working on this job was simply inexperienced (as is too often the case) and not thorough enough. The other 4 boxes in the set of 5 he worked on (all with different patterns) turned out fine.
I hope you were able to follow this.
My point for you to remember is, do not rely solely on digital proofs. They simply give you an approximate idea of what to expect out of the finished product.
This has been a part of my tutorial series called How to Buy Packaging 101. So click the link below to head back if you haven’t finished reading it yet. 🙂