

When you order custom packaging, the packaging company will work with you in handling your packaging graphics. You’ll have a dieline on which to place the digital images, logos etc. for your packaging. You’ll have revisions where you might change or add text or reduce the size of an image, perhaps change a font or the size of text. These are normal occurrences.
Once you receive your packaging and are happy with it, what’s next? Well, I’m sure you know exactly what to do with your new packaging, but do you know what to do with all the digital assets that went into producing the artwork for this packaging?
Let me give you a fairly common scenario:
John Doe has just purchased some gorgeous packaging. It was his first order and he’s excited to finally start selling his product. Everything goes according to plan and within a year he’s almost completely sold out. Now is the time for the reorder.
John contacts his packaging company or perhaps tries a new vendor hoping for a cheaper price. So far so good…until it’s time to drag out all of those packaging graphics – logos, images, fonts etc.
Oh no, where are they? John searches his emails and dropbox or google drive and finds some digital proofs of his artwork, but that resolution is not appropriate for printing. He also manages to find, on a colleagues computer, an early draft of his logo when it was in its development stage.
John’s a busy guy and doesn’t have time for all of this. He asks the packaging company who did his first run if they have all the digital assets for his packaging. They do not.
Scenario number two:
A large corporation with a fairly established brand has hired a new packaging buyer. This new packaging buyer, Jane Doe, is struggling to make sense of the mess her predecessor has left. The digital assets are somewhere, but where? Everything is so disorganized, unlabelled, undated, and there are chains of emails to read and decipher. It’s like being at a crime scene and trying to figure out what happened?
Both John and Jane vow to never let this happen again. They both realize the importance of not only keeping digital files safe, but also keeping detailed notes.
Now all of their files are stored on their computer and on an external hard drive or thumb drive that is kept off-site and encrypted if necessary, and backed up to the cloud. All the original photos as well as artwork and fonts are all accounted for. John and Jane have also decided to keep a doc file that acts as a journal. This journal documents discussions, names, places and dates that pertain to the packaging buying experience.
Now when John and Jane do re-orders, they can feel confident that everything will go well and will take up only a fraction of their valuable time.
The following is a list of digital assets that a packaging buyer needs to keep safe, labeled, organized and on-hand:
Fonts
Fonts files usually have one of two extensions types: .ttf or .otf
If you purchased a font, make sure you document where you bought it and keep a copy of the receipt.
The reason why you need to keep the fonts that you use with your packaging artwork is because fonts are not embedded in the artwork file. When you send your packaging artwork to your packaging vendor or graphics designer, the fonts will not be included. So when the packaging company or graphics designer opens the file (with Adobe Illustrator or Indesign for example) the program will immediately inform them that they are missing the font files and will usually substitute some default font.
So, you must send the font files separately in addition to the artwork file; the graphics designer or packaging company will then have to install the fonts on their computer in order for them to be usable in your packaging artwork.
Photos and Other Graphics
There are two types of images, pixel images and vector images. I’m not going to go into the complexity of this topic, only to give you the bare bones of what you need to know.
Most photos are made up of pixels. The density and amount of pixels determines resolution. A minimum of 300 DPI is required for quality printing on packaging. Photo images are typically handled in an application like Adobe Photoshop.
Artwork that looks “cartoony” (typical logos) are called vector art and drawn from mathematical algorithms. This type of artwork is usually done in an application like Adobe Illustrator. This artwork can be resized without losing quality. That’s the good news. The bad news is when this vector artwork gets converted to pixels and you can’t find the original “vector” version of the artwork, you would then need to start over and redesign the logo from scratch.
Your Brand Logo
Keep a copy of this file as it was created in an application such as Adobe Illustrator. The file extension should be .ai or even .pdf (with all the layers included). This way, if you need to make subtle adjustments to the logo or change the tagline or simply print it on other types of marketing material, you will have it.
Purchased Artwork or Photos
If you purchased artwork or photos from some stock image website, make sure you have the appropriate license for printing on packaging. Also, make note of the name of the website, image name, and login info etc. in case you need to retrieve the original.
Artwork Revisions
Often there are multiple revisions going back and forth from the graphic designer or packaging vendor. I recommend keeping all of the revisions, clearly dating them and including detailed notes about the changes that were made and why.
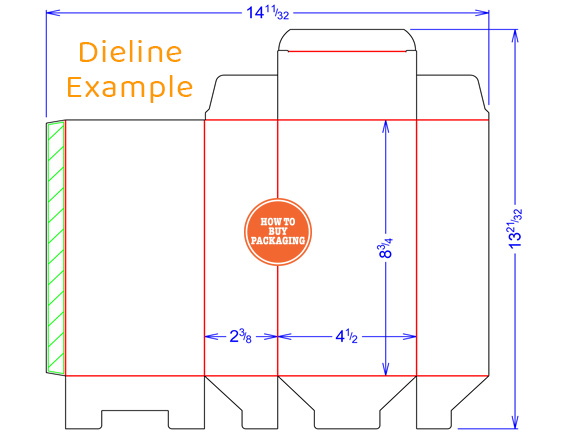
Keep a Copy of the Original Digital Dieline
A digital dieline is the diagram of the outline of your packaging and where you would place your graphics. It is important to keep this file so you don’t have to pay to have it done again, or for shear convenience and time-saving purposes.
UPC Codes (Barcodes)

This one is easy. Just make sure you have the original print quality file from the company you bought the UPC Codes from. If someone else bought them, make sure you not only get the original files, but also make a note of the company from which the UPC codes were purchased as well as any receipts or login information for the account used.
Nutritional Facts
If your product requires a Nutritional Facts Chart, make sure to keep a print quality file of this chart (usually in vector format). If it was performed by a third party, make sure you have the company name and login credentials required to make changes or simply to contact them if you need to.

PMS (Pantone Matching System) Colors

Renderings, Mock-Ups and Previous Packaging Examples
If you had received a digital rendering or a physical mock-up or prototype done on a CAD cutter, it’s not a bad idea to hang on to them, you never know when they will come in handy. Also keep examples of your previous packaging (if you have any), including dates and who manufactured them.
Finished Working File vs Press-Ready File
A finished working file (a computer file created in Adobe Illustrator for example) has your packaging graphics placed on a dieline and completed to your satisfaction. Once you give your approval, the finished working file goes through a few simple steps to make it usable by the packaging manufacturer. One of these steps involves outlining all the fonts (all the text); this makes the digital file a “press-ready” file. What that basically means to you is that you can no longer modify any of the text on your packaging graphics. That is why it is only done once approval is granted.
So it’s important to have both the finished working file (this is the file that is still fully editable) and the press-ready file (not easily editable) in your possession for future use. Of the two, the finished working file is the more important one to have, but if you can get both, you may as well.
If You are Working with A Graphic Designer / Packaging Designer…
Hiring a professional to design your packaging graphics/brand identity, is a smart thing to do.
However, at the end of the job you should take possession of all the working files that the graphic designer used to make your packaging artwork etc. This includes all the fonts, original quality images, logos (in vector format), dielines, working file and the final “press ready” file that is ultimately used by the packaging manufacturer.
The reasons why you want all these packaging design digital assets are because:
A) they belong to you and are your responsibility to keep them safe
B) the graphic designer may lose them
C) you may want to work with another graphic designer in the future and getting all your files from the previous graphics designer a year later may be very hard to do
D) it may just be a simple re-order in which case you don’t really need to work with (and pay) your graphic designer if and until changes to your packaging artwork are required.
In a Nutshell
Whether you are designing your packaging by yourself or using a professional or semi-professional, it is important to keep track and organize all of the important digital files that make up your packaging artwork.
This includes:
- fonts files as well as the receipt (if purchased)
- original image files (.tiff, .crc or even a .psd with original unaltered image embedded in the file)
- all vector art (.ai or editable .pdf with all the layers)
- logos in vector format (.ai or editable .pdf with all the layers)
- original unaltered dielines
- UPC codes and or Nutritional Facts (printable quality with receipts and login info if applicable)
- finished “working” file
- finished “press-ready” file
- keep old examples of your packaging, including dates and where they were manufactured
- keep a detailed journal of dates, places, people, decisions etc. from the entire project, start to finish. (it’s not that time consuming and it will be worth it)
If you do these things you will prevent future headaches and heartaches for yourself and those around you. 🙂
Good luck and may great packaging success be yours!
This has been a part of my tutorial series called How to Buy Packaging 101. So click the link below to head back if you haven’t finished reading it yet. 🙂
One Response
Excelente publicacion